
Quick Answer: How to Add an Email Signature in Apple Mail
To add a professional email signature in Apple Mail, follow these 5 steps:
- Open Mail and select Settings (Cmd + ,).
- Go to the Signatures tab and select your email account.
- Click the + icon to create a new placeholder.
- UNCHECK "Always match my default message font" to prevent styling bugs.
- Paste your signature and set it as the default for that account.
1. Accessing Apple Mail Signature Settings (macOS)
The first step in establishing your professional identity is knowing where the engine lives. Apple Mail centralizes all identity controls within its primary Preferences hub.
Where to Find Settings
Open your Mail app. Navigate to the top menu bar, click Mail, and select Settings (for older macOS versions, this is labeled Preferences). Alternatively, use the Mac shortcut Command + ,.
Account-Based Logic
Inside the Signatures tab, you will see a list of all your active mail accounts. Unlike other clients, Apple Mail allows you to have completely different signatures for your iCloud, Gmail, and Exchange accounts all within the same app. Always select the specific account on the left before creating a signature to ensure it maps correctly.
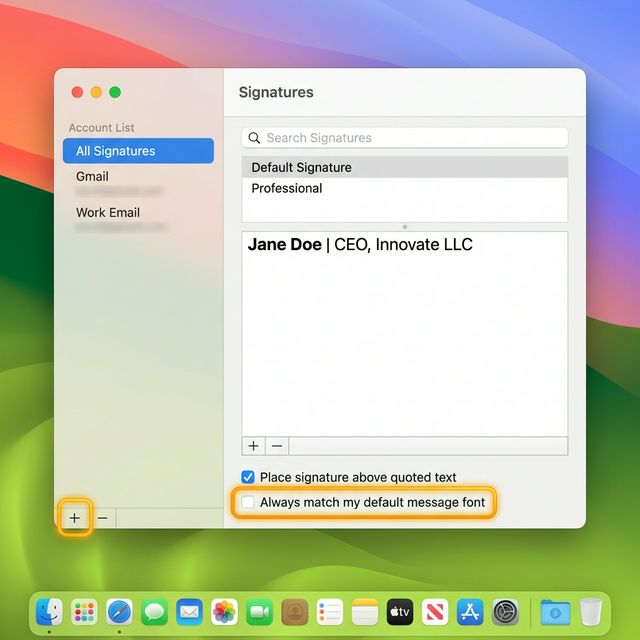
*Access signature settings in the Apple Mail Signatures tab*
2. Step-by-Step: Adding Your Signature on Mac
Follow this specific sequence to ensure no formatting is lost during the installation.
Step 1: Initialize the Slot
Select your work account from the left-hand list. Click the + (plus) icon in the middle column. Give your signature a functional name like "Professional Footer" or "Standard Office."
Step 2: Disable the Styling Lock (CRITICAL)
Look at the bottom of the window. You will see a checkbox: "Always match my default message font." You MUST uncheck this. If left checked, Apple Mail will strip the HTML styling from your professional signature and force it to match your system's body text font.
Step 3: Paste Your Content
Delete any default text in the right-hand preview box. Copy your signature from your generator and paste it into the empty space. Don't worry if images don't appear in this preview; Apple Mail often blocks remote images in settings for security.
Step 4: Assign to New Messages
Ensure your new signature is selected in the "Choose Signature" dropdown at the bottom. This sets it as the default for every new email you compose from that account.
3. HTML Signatures in Apple Mail: The WebKit Factor
Apple Mail supports HTML, but it uses the WebKit engine (the same core as Safari) to handle it. This is why a signature might look different in Apple Mail than it does in a browser.
The Conversion Trap
When you paste HTML into Apple Mail, the app converts the code into its own proprietary format. During this process, it can inject extra line breaks or modify your margins.
Pro Insight: To maintain a clean look, avoid complex "float" or "grid" layouts. Stick to HTML Tables for your structure—they are the only layout method that WebKit interprets consistently across different Mac devices.
4. Advanced Setup: How to Add a "Lock-Safe" HTML Signature
If the standard copy-paste method isn't working for your complex design, you can use the internal file replacement method. This is the only way to ensure 100% code integrity.
- Create Placeholder: Create a new placeholder signature in Mail settings and close the app.
- Locate Signatures Folder: Go to Finder > Go > Go to Folder and paste:
~/Library/Mail/V10/MailData/Signatures/(the V number may vary by macOS version).
- Find the File: Identify the most recent
.mailsignaturefile. Open it with TextEdit.
- Replace the Code: Keep the metadata headers at the top, but replace everything from
downward with your raw HTML code.
- Lock the File: Save, right-click the file, select "Get Info," and check "Locked." This prevents Apple Mail from overriding your custom code.
*Accessing internal Apple Mail signature files for advanced HTML setup*
5. Handling Images and Logos Properly
Images are the #1 reason Apple Mail signatures fail. They either turn into giant attachments or disappear entirely.
Hosted Images vs. Attachments
- The Wrong Way: Drag-and-dropping a logo into the editor. This embeds the file, causing it to show up as "image001.png" in the recipient's attachment list.
- The Right Way: Your signature should reference a secure HTTPS URL for the logo. This keeps your email light and ensures the logo is treated as a decorative part of the design, not a file to be downloaded.
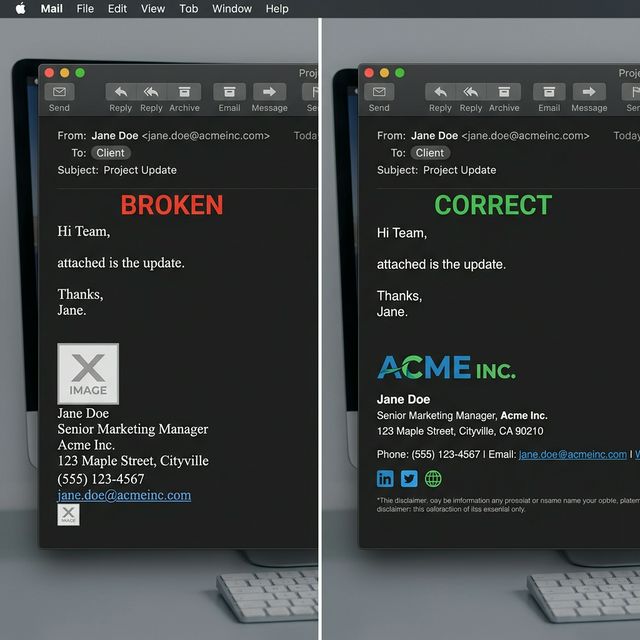
*Avoid the "attachment" bug by using hosted image URLs*
6. iPhone & iPad Signature Setup (iOS)
A common frustration is that Mac signatures do not sync to iPhone. You must set them up manually on your mobile device.
iOS Setup Steps
- Open the iPhone Settings app and scroll to Mail.
- Tap Signature.
- Select Per Account to use different footers for different emails.
- Paste your signature.
- Critical Trick: After pasting, shake your phone to trigger the "Undo Change Attributes" popup. Accept this to restore the original HTML formatting that iOS usually tries to strip.
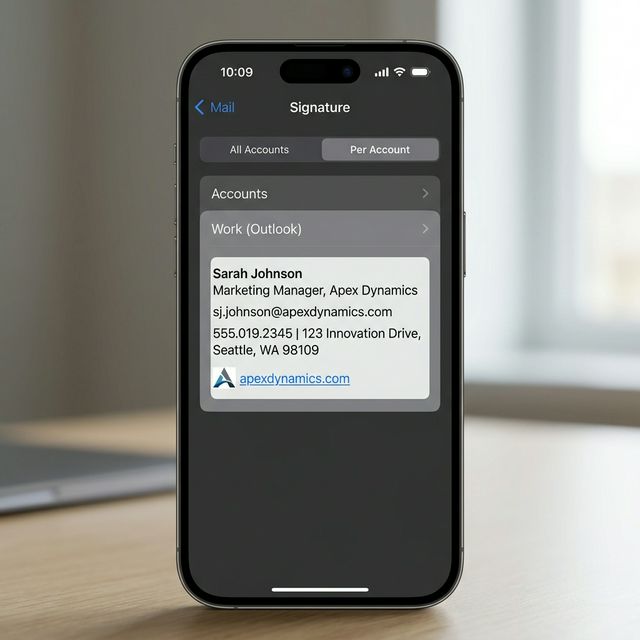
*iPhone signatures are managed separately in the iOS Settings app*
7. Common Apple Mail Signature Issues
If your signature is struggling, check these three specific technical points:
- Issue 1: Fonts suddenly change to Helvetica.
- *Fix:* Ensure "Always match my message font" is UNCHECKED in your settings.
- Issue 2: Images appear as empty boxes.
- *Fix:* Your image host must be secure (HTTPS). Apple Mail blocks non-SSL images for privacy.
- Issue 3: Signature spacing is too wide.
- *Fix:* WebKit handles padding differently. Keep your signature size under 450px to prevent horizontal scrolling on mobile.
*Comparison: Simplify your HTML to avoid rendering breaks in Apple Mail*
8. Checklist for Professional Apple Mail Signatures
Ensure your setup is complete by verifying these points:
- [x] HTML is table-based (no complex CSS).
- [x] Images are hosted on a secure HTTPS server.
- [x] Font override checkbox is disabled.
- [x] Signature is assigned as default in the dropdown.
- [x] Tested in both macOS and iPhone environments.
- [x] Links are verified and clickable.
Frequently Asked Questions (FAQ)
Can I use HTML in Apple Mail?
Yes, but you must paste the rendered visual area from a browser rather than the raw code, or use the "Advanced File Replacement" method for full control.
Why does my signature look different in a reply?
Apple Mail handles replies differently. Ensure your signature is assigned to "Replies and Forwards" in the signature settings dropdown.
Does the iPhone support HTML signatures?
Yes, but the editor is hidden. Use the "Shake to Undo" trick after pasting to restore your HTML formatting on an iPhone.
Instead of fighting with manual HTML files and WebKit rendering bugs, use InboxSign to generate a compatible Apple Mail signature that works perfectly on every Mac and iPhone instantly.